Enter grades individually per class within the tool
Upload a spreadsheet you created
Export a roster from Faculty Grade Entry, enter grades, upload the graded roster
Submitting Grades through Faculty Grade Entry via Grade Upload
Export your roster
Using InsideND, search and open “Grade Submission”
Select the appropriate course form the list by clicking on the course title
Go to the top right section and click on the small gear icon and click export template
The grade upload tool is expecting all .xls or .xlsx files to have at least the following columns with the exact labels
Term
CRN
Student ID
Final Grade
Do not include extraneous characters (ie: /,)
Assign grades in the exported spreadsheet
Save
Import your roster
Select the appropriate course form the list by clicking on the course title
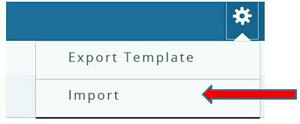
Go to the top right section and click on the small gear icon and click import
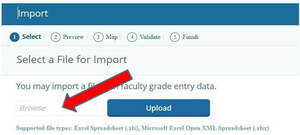
Click into the box marked Browse to select the file you are using, then click “Upload”
Click “Continue”
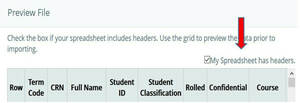
If your spreadsheet has headers, please check the box that says “My spreadsheet has headers” and then click “Continue”
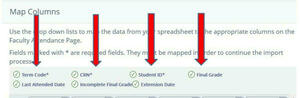
If you did not name your column headings the specific names that were listed above, you will need to manually link your columns to the correct fields here (you can scroll over to see all of your columns). If you see a green check mark in front of “Term Code”, “Student ID”, “CRN” and “Final Grades”, you are properly linked and will need to click “Continue” to continue to import your grades.
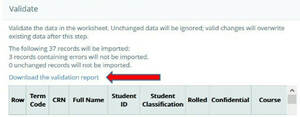
The next screen allows you to review your data before you submit it to be imported. Also on the screen, you will see a “Download the validation report”, that you can click on and see why certain grades did not import.
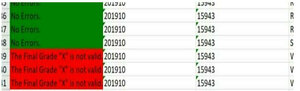
The Validation report will look like this
If you are satisfied, click “Continue”
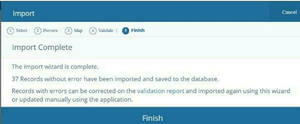
A pop up will appear and inform you of how many records were imported successfully and how many contained errors that were not imported. Click “Finish” to return to Faculty Grade Entry
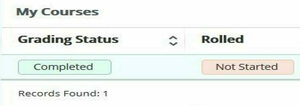
Refresh the page to see the updated “Grading status”